 Searching...
How to Work With and Create Engine Fault Summary Reports
Engine Fault Summary Reports
The Engine Fault Summary report displays a summary of the engine faults detected during the reporting period. The report provides the time that the fault occurred, the diagnostic code, and the total time and distance driven with the Malfunction Indicator Light (MIL) activated (where applicable). This allows you to take action to inspect and address any vehicle problems before they cause significant damage.

Viewing Engine Fault Summary Reports
To view Engine Fault Reports:
- From the Reporting dashboard, select an Engine Fault Summary report from the main list, or filter the list by Type > Engine Fault Summary.

- Click the desired report.
- On the next screen, click the instance of the report you’d like to view.
The full report appears.
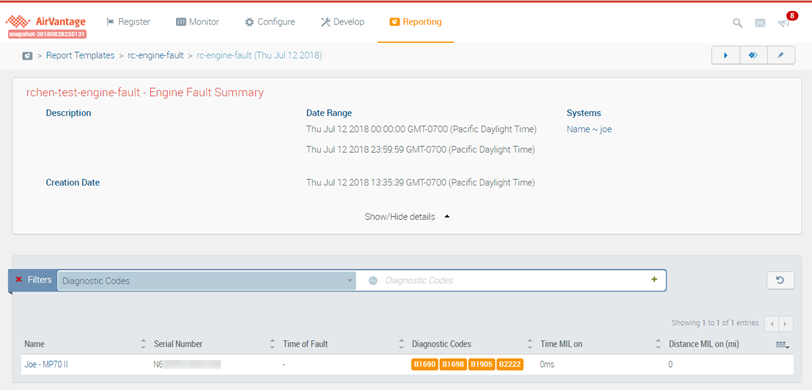


Hover your mouse over diagnostic codes to view more information.

Not all diagnostic codes will trigger a MIL (dashboard light) indicator. Wehre MIL is triggered, values for Time MIL on and Distance MIL on will be included.
Click  to select which columns to display for the report.

Creating an Engine Fault Summary Report
To begin, from the Reporting dashboard, click the Create a New Report icon.
An empty report screen appears.
Select a Template
Choose how often you’d like this report to be run. Click:
Single for a one-time report
Weekly
Monthly
Yearly
Under Report Properties, you can complete the scheduling for your new report. The section below describes how to configure the time and the day on which you’d like your report to run.
To run a report immediately, click Run Report.

Define the Report Properties
The required fields for creating a valid report are Type, Name and Range.
Select the Report Type
Select Engine Fault Summary from the Type menu.

Enter a Name and Description
Give your report a brief, descriptive name. You may want to use a driver’s name, a vehicle model, and/or the AirLink gateway or router model, depending on the type of report you run.
Below the Name field, you can enter a longer report description. You may want to include the report’s schedule and reporting zone.
Select the Reporting Range
The Range menu lists the options for the reporting period. You can select a predefined Reporting Range, or configure a Custom range.
If scheduling a recurring report, select one of the relative date ranges (Yesterday or Last 7 Days, for example). Selecting an absolute range will generate the same results each time.
If you click Custom, a calendar appears, allowing you to select a start date/time and an end date/time for your report.

Select Recipient Email Addresses
Click the Recipient Emails field to select the people you would like to be notified when the report is run.
You can also manually enter email addresses in this field.

Select the Export File Formats
Reports can be exported as PDF or Excel (.csv) files.
To select export file formats, click the appropriate buttons.

Select Units
You can choose to render your reports in metric or imperial units.

Select the Systems
Select the systems for which you want to run your new report. Select checkboxes for the desired system(s), or filter the list to narrow down your choices. You do not need to use the checkboxes to select specific systems. Selecting the checkboxes will override general filters.

Select Advanced Settings: Start and End Dates
The Advanced settings are strictly optional. If you enable these settings, you may want to set a reminder (external to ALMS) to notify yourself of the start and end dates.
Click the Advanced button to display options for selecting start and end dates for your reports. For example, you can configure a weekly report to run for two months starting one week from today.
Clicking Start Time or Run Until displays a calendar on which you can define a start date/time and end date/time.
